Education technology and game-based learning resources, tool tips, innovative pedagogical musings, and general "thinkalouds" of a Digital Learning Consultant. Follow my educational journey on Instagram, X , Threads and Bluesky @watsonedtech, my Facebook Page (facebook.com/edtechelixirs), and the blog hashtag #edtechelixirs. Note that opinions are mine alone, and reviews/mentions of edtech products do not qualify as an endorsement. Subscribe to the blog at bit.ly/signupedtechelixirs.
Firstly, a milestone announcement. As of 9/13/21, my YouTube Channel hit 217,855 views; Edtech Elixirs is at 182,146 views. That means collectively, I have just crossed over the 400,000 mark! Thanks to everyone who has ever read a blog entry or watched a video of mine.
Back to the topic at hand! I wouldn't blame you for thinking that QR codes, particularly in education, may be a ship that already sailed. However, I think there is still life left in them, and apparently I'm not alone. The headline of a recent New York Times article (1/21/21) proclaims "Actually, QR Codes Never Went Away," and as Lora Kelley points out, the pandemic actually increased QR Code usage (for example, it's highly likely that at least one restaurant you frequent asks you to scan the QR Code to view its menu). Kelley finishes the article talking to some educators, including a teacher who (still!) distributes the school newspaper via QR Code.
I've always been a fan of QR Codes. (You can see some Edtech Elixirs entries highlighting them over the years.) With a snap of a phone camera, you can easily get to a URL (the most common usage), add a contact to your phone, or simply read text "hidden" inside the code. While the most basic learning management system can do much of the same, there's something to be said for the kinesthetic nature of having students move around a room snapping QR Codes, or the "self-service" function of going to a poster or table sign and getting your digital hands on a popular handout without having to search for it in a LMS. And the same reasons that a restaurant may have you snap a QR Code with your phone instead of giving you a menu may serve you well in a classroom too: it quickly gets you to what you need, it saves you paper, and is more hygienic.
Of course, Chromebooks are the ubiquitous device in many classrooms, not mobile phones. There have been Chrome extensions for years that would allow you to use a Chromebook to read a QR Code, or even websites like The QR Code Generator that give you that functionality without installing anything. (You can also make QR Codes from the same site.) Now, a recent upgrade in the ChromeOS has made it even easier. The QR Code reader is built into the Camera app, in a tiny button in the upper right of the interface.
Clicking this button creates a target box for you to aim at the QR Code, and the Chromebook takes you from there. This feature should be available on your Chromebook if you have ChromeOS version 89 or higher. Give it a try!
Be sure to check out the following links for more information:
Way back in 2016, I talked about using the camera of a Chromebook. The interface has changed significantly since I published that entry (no more filters!), but it's worth a look for ideas on how the Camera app can be utilized in the classroom. And don't forget...
After a long, arduous and challenging school year, I hope you are finding ways to relax and recharge! Before I slip off myself to my own vacation, I wanted to slip in one more Edtech Elixirs entry before the work of next school year begins.
As I look back on my first days as an edtech cheerleader (as a classroom teacher, and then as a digital learning coach), one of my biggest regrets was being too caught up in sharing the latest fancy, flashy tool. God help me, I actually enjoyed attending, or even sometimes presenting, those auctioneer-style "60 Sites in 60 Minutes" marathon conference sessions. I was eager to capture ooo's and ahhh's from teachers by introducing a just-discovered app. As a new staff member who wanted to prove my usefulness to a district, I was glad to at least get an audience engaged by showing them something novel and new. Don't get me wrong -- I always knew that you should never use edtech for edtech's sake. But before edtech has a chance to transform your teaching, you have to agree to use it first, right?
One of my earliest edtech successes in Shelby County involved Kahoot. As part of my traveling roadshow presentations to faculty -- probably titled something like "10 Digital Ways to Assess!" or something equally cringeworthy -- I shared Kahoot, and boy, did it make an impact. Every single time after I had a schoolful of staff demo Kahoot, I would get stopped in the hallway the next day. A teacher would be nearly giddy. "My students loved Kahoot!" the teacher would rave. "They were so engaged and excited! Thank you for sharing!" And I would smile, and pat myself on the back, and practically levitate.
I regret to inform you, reader, that it took a good year or two for my self-congratulations to turn into disquiet. Teachers and students were beginning to use edtech, so the first hurdle was cleared, yes. But eventually, I had to take a hard look at whether the usage was superficial. (Of course, this is an age-old problem with teaching. To paraphrase Precious Boyle from the title of her excellent October 2020 article, don't mistake engagement for learning.)
So one day, when a brand new convert to Kahoot came bounding out of her classroom thanking me for introducing the tool, I stopped my "you're welcome's" long enough to ask a few questions. "Hey, have you had a chance to analyze the data Kahoot gives you about how each student performed, and how fast they answered? Or noticed any other assessment metrics that proved the students . . . you know . . . learned the content any better?"
"No. I mean, not yet," she said, blinking at me, and probably wondering why I was being dense at understanding her victory. "The students -- they had fun!"
I'm not against fun. Like a charismatic mold growing on the tree of education, I consider myself a fun guy. And a fun classroom is better than a dreary one. Also to be clear: getting someone passionate about edtech is not a bad thing, and if there was a failure to understand a more transformative use of a tool, the failure is on me as a coach and not the coachee. But it was at that moment I pledged to get better at teaching teachers the pedagogy of transformative blended learning. I took a deeper dive into frameworks like SAMR and never looked back. I made sure when sharing a detailed exploration of a digital tool in this blog to at least ask "How could you use it?" as a way of really saying "Why bother in the first place?" That's not to say I've arrived as an expert or gotten it perfect, but I definitely am better at recognizing that edtech without clear instructional context has no value.
With all of that in mind, I was especially pleased to come across a relatively new website, the Chromebook App Hub.
The first thing you will notice about the site is (perhaps not surprisingly, given that Google is behind it) how easy it is to search. There are multiple filters to narrow down an app to various categories (like "Assessment & Feedback" or "Math" or "Storytelling"...or checkmark several that apply), as well as age range, purchasing options, languages and more. The amount of apps catalogued are prodigious; I can almost guarantee that even a cursory search will likely come up with several tools that will be new to you. Clicking on an app will provide further info, such as the developer and helpful resources to get you started using it. However, in the spirit of today's blog entry, all of that is the least impressive thing about Chromebook App Hub. What really struck me was the Ideas section of the site, which contains teacher "Sparks" -- real lessons and practical ways to utilize the various apps to positively impact learning. These Ideas also have filters so you can search by subject, age range, and learning goals. Even better, you can submit your own Spark.
And now we come full circle back to my promise to better contextualize edtech. About a year ago, our staff developer Tracy Huelsman launched the first draft of our seven SCPS Competency-Based Core Design Principles (based on language from the Aurora Institute and 2REV). When looking through the lenses of agency, performance assessment, feedback cycle, anytime/anywhere, move when ready, equity, and clarity of mastery, where might some of our suggested edtech fit? On our district page where such edtech suggestions are kept, I have now noted which competency-based principles apply, linked to a Google Doc with more detail and resources. Let's take Kahoot as an example. It connects with performance assessment ("timely data generated from Kahoot can drive instructional choices") and equity, based on a recently launched translation feature.
Like all things, my attempt to make edtech tools merely one part of a more meaningful blended learning experience is a journey and a work in progress. So wherever you and I may take our well-deserved rest this summer, let's just pledge together to not rest on our laurels!
A few months ago, Google announced a lengthy roll call of upcoming changes and upgrades across its tools and platforms, which I summarized here. One that really caught my attention: starting with Chrome version 90, the Chrome OS for Chromebooks will now include a built-in screen capture and recording tool called (wait for it) Screen Capture!
We've been deploying this latest version of Chrome to our students' Chromebooks for a few weeks now, and recently I was able to go to classrooms and see it in action. I'm happy to report that Screen Capture seems stable and works as advertised. (For Google's official support article on the tool, click here.)
Students with Chromebooks can access this new tool one of two ways:
The keyboard shortcut Control + Shift + "Switcher" (the "box line line" icon key above the number 6)
The "Quick Settings" button in the lower right corner of the screen, where you will find the new Screen Capture button in the tray.
Either choice will then open up your Screen Capture toolbar at the bottom of your Chromebook. (The default is image mode, although you can toggle over to video if you like.) You are now a button push away from capturing the entire screen, lassoing a portion, or capturing an open window/tab; you can also just hit Enter to make the highlighted choice happen. One clever feature is that captured images are automatically put into your clipboard, making it very easy to immediately paste them into a document.
The Screen Capture toolbar. Screenshot from John R. Sowash's website Chromebook Classroom. Read here for some tips and other details about the tool!
Note that if you are in video mode, you can click the settings (gear icon) to turn on or off your microphone as part of the screencast recording. However, two caveats: the only audio you can capture is from your mic (no computer generated audio can be recorded), and trying to record a video of a video that is playing or streaming will tax the Chromebook's processor and produce iffy results at best. Some examples of when the screen recorder might be most effective:
narrating through a Slide presentation
discussing your research on a topic while flipping through tabs of various website resources
explaining your latest revisions on a Doc
showing a teacher how something is not working in order to troubleshoot a tech problem
By default, the saved images and recordings are put into your Chromebook's Download folder, at which point you could either upload it to your Drive or delete it after its purpose has been served. (This also implies that you can do screen capturing and recording without being online!) I find this feature helpful, because it allows you to be more disposable with screen captures and not necessarily clutter up your Drive's storage space; do you really need that image for perpetuity once you've inserted it into your Slide presentation? On the other hand, your Chromebook's hard drive storage is much more limited than a typical laptop, so students may need to be reminded to clean out their downloads periodically.
With such a useful tool now built-in and free, should you stop using other add-on screencasting Chrome extensions? Not necessarily. To take one example, Screencastify offers additional features like "telestrating" annotation during recording, as well as some limited editing, However, the free version of Screencastify is also limited to five minute videos! It is therefore hard to beat Screen Capture, especially for its convenience, simplicity and speed of use.
Earlier today, Google held their global online livestream "Learning with Google." Over the course of ninety minutes, they rolled out a roadmap of upcoming changes and upgrades to the Google platform happening between now and the end of the year. It was a bit of an information blitz and I felt exhausted afterward trying to take notes and keep up. If there was ever such a deluge of new Google announcements released in one afternoon, I can't remember it.
As a way of digesting some of the highlights of their announcements, I thought I'd blog! Let me say a disclaimer from the top: as much as I am trying to be accurate, I could have made an inaccurate note or the timetable might change. So make sure you check directly with Google (like using the link to the Google Education blog entry above) to verify pricing and other details.
A Change of Name and Four Options
First, a question to make you feel your age: did you know that Google Suite apps are over a decade old? Hard to believe Docs and Drive started back in 2008. As these tools grew from Google Apps for Education to G Suite for Education, many wondered if our free ride would end. And it hasn't yet...at least, not quite.
The good news: Google says they are committed to a free option for education. However, besides a name change to Google Workspace for Education (to better align with their actual Workspace business offering), it will now offer THREE premium paid tiers: Google Workspace for Education Standard, Teaching and Learning Upgrade, and Google Workspace for Education Plus.
What are the differences?
Google Workspace for Education Fundamentals is basically the current free version of G Suite for Education.
Google Workspace for Education Standard will be available for $3 per student per year (and you have to purchase for all students in your domain all at once). It offers a bit extra over Fundamentals, but mainly on the admin side of the fence: enhanced security features, some log exporting, and easier data migration.
Teaching and Learning Upgrade will be available for $4 per license, per adult, per month. (Assuming you want the upgrade all year, that means $48.00 per staff member.) This granular distinction is important, in case you possibly only want certain staff to have this upgrade and only for a certain number of months. Teaching and Learning includes originality reports for student work, a soon to launch Classroom Add Ons feature (see the below section for more details), and many of the previously announced Google Meet features like breakout rooms, recordings that do not expire after 30 days, and room polling. As you decide which staff may need the upgrade, consider the people who will most likely be leading will need it. For example, a staff member with the T & L upgrade who creates a Google Meet can have breakout rooms AND a non-upgraded staff or student attending such a Meet would still be able to interact in those breakout rooms; however, if a non-upgraded staff member creates a Meet, breakout rooms are not an option. (One assumes features like Classroom Add Ons work in a similar way; it is a question of whether the creator of the Classroom has the upgrade or not.)
Google Workspace for Education Plus -- formerly Google Enterprise for Education -- is the Cadillac version, available in April for $5 per student per year (and you have to purchase for all students in your domain all at once). It includes all the features of Education Standard AND Teaching and Learning Upgrade. You also get some bonus features such as an interior Google search (allowing you to look up public Docs across your domain), livestream capability to 100K users, and a synching of Google Classroom rosters to your SIS (Student Information System, such as Infinite Campus). As you budget and consider your options, definitely compare your total cost of upgrading all staff to Teaching and Learning versus the cost of upgrading your domain to Plus -- you may find that with just a little more expense, Plus provides maximum benefit.
From this point forward, when you hear a new Google feature launch, verify which tier it will apply to. It may not be yours! For more details on your options:
Google Classroom, Forms, Docs, and Jamboard Upgrades
Fun fact: since February of 2020, Google Classroom has gone from 40 million users to 150 million worldwide!
Here are some other highlights rolling out by the end of the year:
Google will launch a Classroom Add Ons "store." This creates an opportunity to put certain outside tools inside of your Classroom Assignments -- students can access and complete them without leaving the tab, and then their scores/grades will go straight to the Classroom's gradebook. Announced partners available at launch will include Nearpod and Kahoot. Available with Teaching and Learning Upgrade or with Plus.
There will be a "Student Engagement Tracking" to analyze student usage. When did they last log in? What was the last thing they submitted?
For admin, deeper and more detailed analytics of Classroom usage across the domain. Available with Standards or with Plus.
The mobile app version of Classroom will be able to work offline and will be more effective with intermittent Internet/cellular connection. Additionally, a student using the Classroom app will have an easier time, and more options, for submitting pictures (such as taking a pic of a "paper and pencil" assignment).
Rich Text Formatting is coming. You can finally bold, italic, underline text! Add bulleted lists!
Forms: The angels must be singing, because Forms will begin saving your work in the background as you type and select. No more lost information from accidentally leaving the page, closing the tab, or losing your Internet connection. And if any of those things happen, you will be able to return to the Form and pick up where you left off. (Data is remembered for 30 days or until the Form is submitted, whichever happens first.) That includes Form Quizzes!
Docs: The Citations feature is improving with some smart suggestions. For those with Education Plus, Google is adding an "Approval" feature under File; you would be able to submit your Doc to selected members of your team to "sign off" on your work.
Jamboard: you will finally be able to track changes and see edits made by your students!
A preview of "Student Engagement Tracking" in Google Classroom coming later this year.
Google Meet
What would so many of us do without Meet during pandemic teaching? Therefore, and not surprisingly, Google spent some significant time talking about the future of Meet.
Google first tipped their hand to the start of premium tiers with Meet features that were exclusive for those that paid for Enterprise, such as beloved breakout rooms. In fairness to Google, however, not all of its upgrades cost money, and some of the future ones will be for (free) Fundamentals unless otherwise noted.
At the end of the meeting, teachers will have the option to end the Meet for all participants, including those in breakout rooms. That means no more students possibly staying on to chat without you.
In the next few weeks, you will be able to mute all participants, and choose whether students can unmute themselves.
Starting in August, there will be several improvements for Meets that are integrated into a Google Classroom:
students will not be able to join the Meet until a teacher starts it
only students and teachers of that Classroom can join that Meet
all teachers of that Classroom will have moderator controls
In Google Calendar, breakout room participants can be determined in advance while creating a calendar event. Available with Teaching and Learning Upgrade and with Plus.
Besides hand raising, students will also be able to react with emojis -- and in a wonderful nod to diversity, can change the skin tone of the emojis to better reflect themselves.
Meet will also be better optimized to work with lower strength WiFi.
Admittedly, I was a bit surprised to hear newsworthy updates for Chromebooks and its Chrome OS, but they included:
Starting with Chrome 89 (launching March 9), the OS for Chromebooks will include a built in screen recording tool! This may replace your current screen recording apps like Screencastify that need to be separately installed and may have limited recording times.
Google Meet will be optimized for Chromebooks and Chrome, which will especially be welcome when multitasking or for Chromebooks near their end of life. This may become important as more anecdotes and news stories come out about Chromebooks struggling with other teleconferencing platforms that could also be shortening their life cycle.
More Chromebooks will be offered with dual cameras, allowing students to better take pictures or record videos beyond selfies.
Accessibility and the Future of Assistive Technology
While "Accessibility" has always been part of Chrome settings that follow you across devices, Google announced some upcoming features such as multiple options for changing your cursor color. (For more on Google and accessibility, check out this link.) The livestream ended with an interesting discussion on the future of Google as assistive technology. Consider "assistive" as any way to augment or make your life easier; for example, Chrome remembering your password or autofilling your shipping address. Artificial Intelligence, however, is making the possibilities even more intriguing. AI may become your next classroom Instructional Assistant! (And yes, I'm trademarking the acronym AIIA.). Google shared how districts are utilizing Google Cloud Success Services to create a chat virtual assistant, and in one example, it was able to solve 92% of user inquiries on its own. Other examples include typing an equation into the Google search button and getting a step by step explanation of the solution (something you can do now with the mobile Google Lens app), or typing "[kind of problem] practice problems" to get virtual self-tutoring.
An example of searching "linear equations practice problems." Note that you not only get those practice problems, but an overview, examples and more!
Between the product announcements, the livestream shared some inspirational pandemic teaching stories from across the world. Diana Parra, Professor of Information and Technology in Medellin, Columbia, said: "My challenge at the moment as a teacher, is to take the technical things we know, and amidst a crisis, to make them human." May we all do our best to take the digital tools at our disposal to make our teaching not about the Internet or Google Apps or the device but the human student at the other side of our screen. Our teaching may not be in person, but we can still try to make it personal.
If you're interested in watching the archived livestream, here is the video (1 hour 37 minutes):
What is an upcoming Google feature that makes you excited? Share in the Comments below!
Edit 2/19/21: The archived video of the livestream is now published, and I added it to the blog entry. Also, I made a small edit about the Forms update - an incomplete Form is only saved for 30 days or until it is submitted, whichever comes first.
Edt 2/23/21: After watching a presentation today by AmplifiedIT, a few more clarifications and corrections: The new Doc Approval feature is only available for Education Plus, Chrome 89 is launching March 9, and I explained what could potentially happen when T & L upgraded staff interact with non-upgraded staff.
Edit 4/28/21: I was made aware that the Teaching and Learning upgrade license is based on a MONTHLY fee, not annually like Standard and Plus. I updated the information above to reflect this, as well as included a useful Google resource that compares the editions side by side.
We are in a season that in pre-pandemic times usually meant unfettered and uncompromised traveling and geographic relocation. In the midst of COVID, doing such movement and visiting of others safely is challenging, which leaves me a bit gloomy. It is likely that such a melancholic mindset has inspired me to think of Walt Whitman (a balm to the overcast soul if there ever was one!), as well as digital tools that allow at least a virtual facsimile of travel.
Google has a long history of such geographic, useful digital tools. Of course, Google Maps has long been a mainstay of their Suite, with upgrades along the way like Street View. Google Earth started as an impressive downloadable program, but originally took a sizable hard drive footprint and considerable computer processing power. Yet both of these began as consumer, and not creator, tools. That changed with Tour Builder, which allows you to utilize the Google Map data and create narrative presentational "stories" you could share with others. Unfortunately, Google recently announced that Tour Builder will be shuttered in July 2021. The good news? Google Earth for Web -- a browser-based version of Google Earth that works without a download, which means you can use it on a Chromebook! -- now has similar creator tools.
How does it work?
Google Earth for Web (hereafter "GEfW" for short) allows you to make a guided map journey that you can present to, or share with, others. In some ways, it is like an interactive geographic timeline, in that you can take any place on Google Earth as one of your "stops" and add contextual text, videos and pictures. A key advantage that GEfW has over Tour Builder is that it is now seamlessly integrated into your personal Google Drive. Your projects save inside a "Google Earth" folder (created the first time you save a GEfW project), which makes finding and sharing them very easy. Note that your Chrome browser must have hardware acceleration on for Google Earth to work; this is under "Advanced" in your Chrome's settings. (Hardware acceleration is sometimes disabled by your district's Google admin.)
In this tutorial video (2:06), you learn how to start a Google Earth project and a quick overview of its tools:
This video (2:59) goes more into depth about the creation tools of GEfW:
When you decide to present a finished project, the navigation feels very similar to Google Slides. In fact, inserting a slide is a media option for GEfW, allowing you to have an introduction and conclusion, as well as possible transition slides throughout.
Speaking of a similar feel to other Google products, you will find the sharing tool of Google Earth for Web just like any other Google Doc. You can simply create and share a link for "view only" rights, but you can also invite contributors to collaborate with you on editing the project.
How could you use it?
A Google Earth for Web presentation would certainly be more dynamic than a typical direct instruction "click through the slides" experience. But the ability to empower students to tell their stories in new ways is really where GEfW can elevate learning. This video (2:12) gives some great examples of how your students could integrate GEfW into their next passion project or PBL:
Downsides?
When opening up a previous project, or even just opening up Google Earth for Web, be prepared for a little lagginess as the media loads in your browser. Your mileage may vary depending on your Internet connection and the performance ability of your device. Considering how graphic-intensive the application is, this is not a surprise. When presenting or editing a GEfW project, I highly recommend shutting down unused programs and minimizing your open browser tabs.
Enjoy creating unique stories utilizing the vast Google Earth data! And if the current holiday season and the pandemic is making you as melancholic as it is me, remember Whitman's wise words:
The earth never tires,
The earth is rude, silent, incomprehensible at first, Nature is rude and incomprehensible at first,
Be not discouraged, keep on, there are divine things well envelop’d,
I swear to you there are divine things more beautiful than words can tell.
As our district has returned to school under non-traditional instruction (NTI), I have been visiting the teachers who are in our buildings -- planning, assessing, synchronously teaching, meeting online with students in small groups and one-on-one -- as the students are unfortunately at home. As always, I am impressed with not only the teachers' innovation but their positive attitude in less than ideal circumstances. The current growth and transformation in their teaching will have long reaching effects. As our new superintendent Dr. Sugg often quotes, we are creating a foundation for "better than normal" learning when students are once again in our buildings.
Often in my classroom visits, I end up sharing an aspect of Google. I realize that I have amassed, in various one-sheets and blog entries, several helpful tips and tricks....enough to put together this blog entry as a "greatest hits" collection. Some of these are not well known, others could be considered hacks, but the common theme is that all of them are pragmatic and could be easily applied tomorrow in a digital classroom.
Calling OUT by phone in Google Meet. Helpful when your student needs to participate or be contacted but does not have Internet. (Note: this may end for the "free" educational version of Google Meet on September 30.)
Translate captions and chat in Meet. A potential game changer for EL students. All of the Google Translate languages can potentially be used!
Google Classroom and Guardian Emails. Parents can receive a weekly email "report" on what is going on in your Classroom, although it takes a few steps of setting up.
"Google Jamboard." A relatively new Google app that will soon be integrated into Google Meet. Think of it as a collaborative "digital corkboard" for brainstorming, an entrance/exit slip to assess student thinking, or a place to capture opinions.
"Google Keep." An underutilized and underappreciated part of the Google Suite, especially if you couple it with its mobile app! Make short notes, create artifacts, track and document your conferring.
Inserting audio in Google Slides. While the insertion of audio is simple, this Doc details ideas for how to create the audio in the first place, pedagogical examples why audio in Slides could help, and options for formatting the audio's appearance/playability.
Take a picture inside your Doc (or Slides, Sheets, Drawing). Did you know that you can Insert>Image and directly utilize your webcam? This Doc shows how, but also gives pedagogical examples of when this could be helpful.
And here are some of my favorite Chrome Extensions:
Mote (audio comments on Google Docs and in Classroom)
Recently, a teacher asked for a recommended text to speech tool for Chromebooks. Of course, a Chromebook means it has to be a Chrome extension and can't be a program to install. While there are many to be found, most text to speech extensions fall into one of two categories. The first: they are very useful but cost for their full capability (a popular example is Read & Write for Chrome). The second: they are free but offer limited usability and/or functionality.
I hadn't looked in a while, so I was glad to take a peek at the Chrome Store to see what was available now. After playing with several and reading Chrome Store reviews, I found one that I can easily recommend: Read Aloud. It is free with no hidden charges.
Note the bullhorn extension icon for Read Aloud in the upper right.
While some text to speech (TTS) tools may excel in an area or two, Read Aloud ranks highly across multiple aspects:
It is easy to use!
It grabs text from the website, simplifies the font/formatting, and puts it in an easy to read “box”; it then highlights text as it reads (although in settings, you can turn highlighting off).
Multiple male and female voices are available in a fairly normal “American” accent. These are included at no charge.(Many TTS tools have only one voice with an English affect, or additional voices cost additional money.)
It works on Google Docs.(Many do not!)
You can adjust speed and pitch.(Many only have this option for a premium/paid version.)
It is one of the few TTS tools that can read a PDF that is opened inside a tab of your Chrome browser.
It is important to note that while typical websites should be fine, Read Aloud will NOT work inside a learning management system (LMS) such as Schoology or Edmodo.However, this is true of nearly all TTS extensions (such as Read & Write), paid or free.
You can get to the settings (gear icon) by hitting the bullhorn icon, then hitting stop to end reading the text aloud. Here you can change the voice with dropdown choices, use the sliding bars to adjust speed and pitch, and turn text highlighting on or off. You can also test what this sounds and looks like without using an actual website page.
Do you recommend a different text to speech Chrome extension that is free? Share in the Comments below.
Since our 1:1 rollout, one of the most popular requests from teachers is a way for students to quickly share to a central display -- mainly, a projector screen. There are various “sharetech” devices we have out in our district environment that help with this (AppleTV, Chromecast, Screenbeam), and the issues usually boil down to:
Two of these are not device agnostic (AppleTV only work with iOS devices, Screenbeam with WIndows).
This sharetech sometimes works inconsistently on school wifi, especially when students are on a different network than the teacher or the device itself.
The sharetech can be pricey, making a “per classroom” equitable solution costly.
Since many of our (older) projectors are VGA but these devices are HDMI, it requires adapters or special cables, costing even more money.
This year I discovered Google Cast for Education. (Note: only people with G Suite for Education accounts can be “receivers,” but anyone with an updated Chrome browser can cast.) It’s free, and works through the Internet, which means it doesn’t matter if people are on different networks. Still, it sounded too good to be true. Are you telling me that even on school networks, so long as the teacher is connected to his/her projector, a student could just share their screen with a click? Without buying any hardware? For free??
After a request by Amy Dickenson (a fifth grade teacher at Painted Stone) for ways that students can share their screens, I took an investigative plunge. As far as the answer to those three questions above, the short answer is: yes! I next enlisted Ms. Dickenson and Dan Edelen (teacher at the 3PT program at Clear Creek) to try it out. More on their findings below!
Here is a short (1:25) video overview of the tool from Google:
How does it work? First, make sure your actual browser is logged into your G Suite for Education account. Click on the little button in the top right of your browser that has your name. Make sure the account shown is your G Suite — if not, log out and log in with the correct credentials.
Next, the teacher should install the app. Students do NOT have to add the app in order to cast to someone, so long as their Chrome browser is version 52 or higher.
The first time you launch the app, it will ask to establish some settings.
Choose a “Receiver Name” — that’s you! (Something like “Mr. Watson’s Computer” is probably good enough.)
I would recommend checkmarking “Automatically full screen new presentation sessions” but leave the other two uncheckmarked.
You can always change the Settings later.
You are now ready to receive! (You can close the app at any time and launch it when you like. Remember, no one can cast to you unless you have the app running, and a student can never “hijack” your computer.)
In order for students to “find” you, teachers have to add student names to allow them to “see” your device. Click the blue Share button while casting and add their Google account emails and the appropriate permission level. (Can they present automatically as soon as you are casting, or have to request permission?) This interface is very similar to how you would share a Google Doc with others. Note that you only have to add the names once, not every casting session. Also, Google Cast for Education automatically pairs up nicely with Google Classroom (you can set up permissions for an entire class instead of individual students).
Students can cast to the teacher’s device by:
clicking the Google Cast app icon in their Chrome browser and choosing the correct receiver name (if not installed, that’s ok…try the other two options)
right click inside their current Chrome tab screen, choose “Cast to…” and choosing the receiver
clicking on the Menu (three lines) or More (three dots) in the top right of browser, choose “Cast…” and choosing the receiver
You can choose to cast just the current Chrome tab or your entire desktop.
One last note: as a teacher, you could cast from one of your devices to another of your devices attached to the projector. (For example, from your laptop to your desktop computer plugged up to the projector.) Just follow the student instructions on your “mobile” computer to cast to the “fixed” computer, and follow the teacher directions on the receiving device. You do NOT have to put yourself on the permission list.
An educator made a comprehensive video showing how to use Google Cast with shots of the teacher and student screens (5:34):
How could you use it? Ms. Dickenson discussed how this makes student sharing so much easier. For example, she has a student who will teach a seminar on how to turn Slides into a movie; the student presentation can be shared without plugging in and out of a projector. It’s also faster casting versus sharing through Google Drive; with a click, the class can see the student tab/desktop. With a “fixed” computer in place, others can easily be mobile and share (students AND co-teachers). As Ms. Dickenson put it, “I like it, because it won’t always be my material on display -- it will be the students, too. It gives them a voice, and help them believe what they create is important and they can change the minds of classmates, and even the world.”
Mr. Edelen was excited about the idea of creating stations around the classroom, centered around displays and Chromecasts. (The ability to cast to a Chromecast as well as a receiver computer is built into the function and app.) Sharing can occur at a rapid speed. He also discussed experimenting with possibly casting a tab to one display while casting his desktop to another!
Downsides? When I played with this on our network, I’ve noticed that when you set person for “Request permission,” there may be a long delay for the request to show up on the receiver device, or it may not show up at all. You may need to play with permission access to get this to work; while “request access” is likely preferred, try “present automatically” if you have trouble. (I should note that Ms. Dickenson and Mr. Edelen did not have any trouble.)
If students install the Google Cast for Education app, they could cast on each other’s devices. This could get troubling without the proper digital citizenship culture, but remember: you can only see a cast if the app is running, and casting can be controlled if the receiver makes sure they have to give permission first. Also, you could argue that students can already share a Google file with “bad stuff” too.
I hope that Google Cast for Education creates an easy and free way for students to share their presentations, exhibitions, and thinking in a whole class environment! Be sure to share your stories and ways to use Google Cast below in the Comments.
One of the struggles with a Chromebook is recording video. In terms of "out of the box," you can only use the webcam for taking still pictures. While this is useful, recording videos is a needed functionality for students to better demonstrate their understanding, or create engaging presentations. However, you can't install programs on a Chromebook, and some sites require a Java plug in that won't run on the device. For example: for most laptops, my favorite screencasting program is Screencast-o-matic. It can be installed on your desktop (my recommendation) or ran inside of the web browser. The final video makes a glowing holo around the mouse cursor to help track its movements and, if used intentionally while recording, can help bring attention to a particular word, phrase or part of a picture. Lastly, the video can be easily exported to your desktop or uploaded to your YouTube channel or Schoology Course. (It's free for exported videos fifteen minutes long or less.) However, Screencast-o-matic won't work even within the browser of a Chromebook because of that elusive Java applet, and again, you can't install the program. So if not Screencast-o-matic, what are your options for video recording?
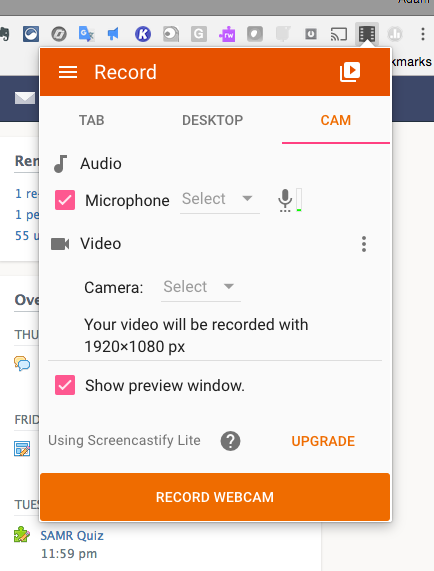
There are several Chrome apps and extensions that will do the job, but from anecdotes, reviews and personal experience, I recommend the Screencastify extension. The Lite version is free, yet fairly generous: your videos can be up to 10 minutes long, and you can record up to 50 videos a month. While you can do traditional screencasting with the app, you can also choose the "Cam" option to only record via the Chromebook's camera.
I recommend checkmarking the "Show Preview Window" option to make recording easier.
Best of all, any videos made will automatically be saved to your Google Drive. The first time you record, a "Screencastify" folder is created in your Drive, making it always easy to find clips later.
When installing Screencastify and using it for the first time, be aware of all the various permissions it requires: to access your Drive, to access your webcam, etc. Make sure to okay all of these so it will work properly.
Screencasting can be a performance hog, especially on a Chromebook. I recommend closing out as many tabs as possible while recording.
It will take a few minutes to render the video so it can be played from Google Drive. If it's the maximum length of ten minutes, that might mean 15 minutes or more to finish rendering. If in-class time is limited when using Screencastify, plan accordingly. Once finished, the file can be renamed and shared just like any other Google file.
Screencastify, like many screencasting tools, is simple for "one take jake" recordings. Don't expect fancy editing tools or ways to cut clips together. (You may want to consider WeVideo as a cloud based editing option.) However...
Finished videos on your Drive can now be easily inserted into Google Slides. (In the past, you could only insert YouTube clips.) Once inserted, you can right click the video for some limited ability to trim the video; you can tell it when to start or stop. This might be helpful if doing a presentation and you only need to share part of the video.
Last but not least, Screencastify will ask the person installing the extension what their role is; make sure they say "student"! Next, it will ask if they are 13 and older, or under 13. I wanted to clarify what the implications of that choice meant, so I emailed Screencastify's support and got this response:
"Under 13 students have the ability to use Screencastify. We have numerous classrooms of all ages using Screencastify. However, students choosing under 13 does a couple things:
1. It removes them from receiving any unsolicited emails from Screencastify. The students can still reach us for help though.
2. It removes them from any Google Analytic tracking."
My advice? It may be best for students to say "under 13" to better protect their data, but regardless, students should honestly answer the question; under 13 can still use the extension.
I hope your students use Screencastify to bring their presentations and exhibitions to the next level, as well as provide teachers with another way to assess learning.
Update 3/30/17: In my original entry, I neglected to highlight two other important functions. When Screencastify is in its Tab (screencasting) mode, you can:
record streaming video while cleanly capturing computer audio
annotate in real time while recording using some simple but effective drawing tools.
You can see an example of both in this short linked video I created. Note that the audio is slightly out of sync with the video. You can minimize this by reducing the amount of programs running or tabs open on your Chrome browser, but there will likely always be a touch of this lag.
When you only want the "tab audio," make sure to uncheckmark the box for "Microphone." Another option would be to use a headset or earphones/mic and keep both boxes checkmarked; you could then pause the streaming video and make a point or ask your listeners a question. (I don't recommend keeping both boxes checkmarked without a headset or earphones/mic, because your laptop mic will pick up the audio of the streaming clip from your laptop speakers, causing echo and distortion.)
The drawing tools are on the lower left. You can change color and size, as well as erase. If you used it with the microphone idea above, you could not only narrate but literally illustrate your point!
Do you use Screencastify, or another Chrome screencasting app/extension? Share your experience in the Comments below.
Welcome back from the holidays! We had our first significant snow last week, so Thursday and Friday (January 5 and 6) became our first official and inaugural SnoGo days!
For the uninitiated, "SnoGo Days" are non-traditional instructional days, where students work at home on material prepared in advance by teachers. It's the enactment of our philosophy that learning never stops and continues beyond the boundaries of a brick and mortar building. The teachers also remain in contact with students via email, phone, messages via Schoology, and more. Speaking of Schoology, our LMS was a crucial tool to organize work and accept submissions during SnoGo . . . and students definitely used it. Here's a way to compare just how much: during the week before winter break, our most active Schoology usage day inside our buildings was December 13 with 45,591 Schoology page views. On January 5 and 6, we had 79,046 and 75,929 views, respectively. I should point out that teachers certainly could give students a menu of optional offline work, and just as they would for an excused absence, students have a small window to make up work upon their return. We don't want lack of Internet access at home to limit their SnoGo learning!
Our SnoGo caught the attention of two local newstations. WHAS 11 discussed the non-traditional nature of the learning. WAVE 3 talked to the Leonberger family, and got this great quote from eighth grader Jake: "I think it's really cool they gave us these Chromebooks and made SnoGo a thing. It makes it so kids can pace themselves at home." (Add a path of learning and factor in the choice of when to do the work, and you have our 3PT program.) Both stories include video with some helpful visuals of Schoology at work.
And learning didn't stop with students. Lora Shields (our Shelby Staff Developer) and I created modules in -- what else? -- Schoology, in order for classified staff to have professional development online during SnoGo.
Several teachers, principals and students tweeted throughout our SnoGo, but this is probably my favorite:
*******************************************************************
On Day Two of SnoGo, I took an already scheduled trip over to a nearby neighboring school: Eminence. I've been wanting to see their library expansion, named the EdHub, since it opened at the beginning of the school year. Along with SCHS's librarian Julie Webb, we got the grand tour. Here are some of my social media posts:
I particularly like the picture in the last tweet of the Scantron sheet and pencil, an archaic artifact of the past, enshrined in a museum case for future students to puzzle its ancient purpose and use.
We left with some great inspiration on how to better utilize our own libraries and increase our makerspace opportunities. Thanks to the EdHub Director and secondary librarian James Allen for being a gracious host!
It's hard to believe, but today our Shelby County students and teachers begin a new school year! And whether you are an educator just starting, already started, or start next week, I wish you the best and most productive and joyous 36 weeks ahead.
Did you have a good summer? Did you travel and rejuvenate yourself? On the personal side, my family and I visited friends in Ontario, Canada, not far from Toronto and Niagara Falls. Among our stops was the Waterloo Region Museum. Although the museum itself had interesting exhibits, it was its Doon Heritage Village that truly was a memorable experience. Strolling through a replica of a 1914 Waterloo town, complete with curators in period costumes who share what life was like a century ago, made me realize the power of immersive educational experiences in real time and in real spaces.
That's not to be too dismissive of the virtual educational possibilities of Pokemon Go, Google Expeditions or the new VR Nearpod "field trips," but authentic role playing is hard to beat!
On the professional side, I was fortunate to once again be a part of the planning and organizing of EdCampKY in July. We had three firsts:
We held it at an elementary school.
Shelby County was the host -- or more specifically, Southside Elementary.
We had a theme: Star Wars!
The EdCampKY went wonderfully, as always because of the attendees. Special thanks to the 501st Legion, who put in an appearance that helped raise money for charity and gave me the opportunity to take a picture with a stormtrooper! (One item can now be crossed off my bucket list.)
Last but not least...it is very exciting to see how nearby districts are launching their own Chromebook and GAFE initiatives. In the last few weeks, I was fortunate and flattered to be asked to facilitate some start of school PD with Scott and Trimble Counties. We at Shelby consider it opportunities to become learning partners with other districts and grow together in the digital conversion of classrooms to come.
So wherever you are in your edtech journey, remember: take risks, fail forward with purpose, and dare to transform your teaching this year!