Showing posts with label webcam. Show all posts

Friday, March 17, 2017

Screencastify

One of the struggles with a Chromebook is recording video. In terms of "out of the box," you can only use the webcam for taking still pictures.  While this is useful, recording videos is a needed functionality for students to better demonstrate their understanding, or create engaging presentations.   However, you can't install programs on a Chromebook, and some sites require a Java plug in that won't run on the device.  For example: for most laptops, my favorite screencasting program is Screencast-o-matic. It can be installed on your desktop (my recommendation) or ran inside of the web browser. The final video makes a glowing holo around the mouse cursor to help track its movements and, if used intentionally while recording, can help bring attention to a particular word, phrase or part of a picture.  Lastly, the video can be easily exported to your desktop or uploaded to your YouTube channel or Schoology Course.  (It's free for exported videos fifteen minutes long or less.)   However, Screencast-o-matic won't work even within the browser of a Chromebook because of that elusive Java applet, and again, you can't install the program.  So if not Screencast-o-matic, what are your options for video recording?

There are several Chrome apps and extensions that will do the job, but from anecdotes, reviews and personal experience, I recommend the Screencastify extension.  The Lite version is free, yet fairly generous: your videos can be up to 10 minutes long, and you can record up to 50 videos a month.  While you can do traditional screencasting with the app, you can also choose the "Cam" option to only record via the Chromebook's camera.
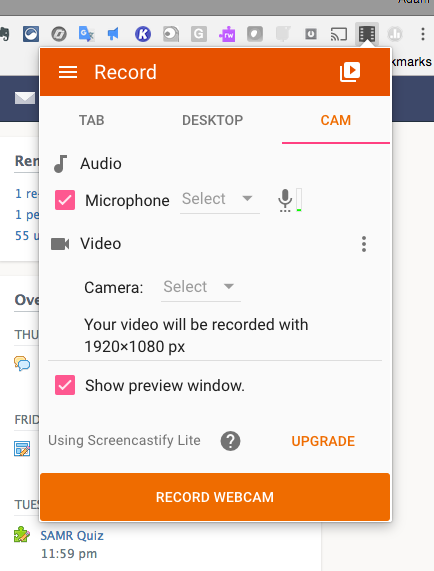
I recommend checkmarking the "Show Preview Window" option to make recording easier.


Best of all, any videos made will automatically be saved to your Google Drive. The first time you record, a "Screencastify" folder is created in your Drive, making it always easy to find clips later.

The directions for installing and running the extension are pretty straightforward.  Therefore, instead of instructions, I want to share some tips for using and installing Screencastify:

  • When installing Screencastify and using it for the first time, be aware of all the various permissions it requires: to access your Drive, to access your webcam, etc.  Make sure to okay all of these so it will work properly.
  • Screencasting can be a performance hog, especially on a Chromebook.  I recommend closing out as many tabs as possible while recording.
  • It will take a few minutes to render the video so it can be played from Google Drive.  If it's the maximum length of ten minutes, that might mean 15 minutes or more to finish rendering.  If in-class time is limited when using Screencastify, plan accordingly.  Once finished, the file can be renamed and shared just like any other Google file.
  • Screencastify, like many screencasting tools, is simple for  "one take jake" recordings.  Don't expect fancy editing tools or ways to cut clips together.  (You may want to consider WeVideo as a cloud based editing option.)  However...
  • Finished videos on your Drive can now be easily inserted into Google Slides.  (In the past, you could only insert YouTube clips.) Once inserted, you can right click the video for some limited ability to trim the video; you can tell it when to start or stop. This might be helpful if doing a presentation and you only need to share part of the video.
  • Last but not least, Screencastify will ask the person installing the extension what their role is; make sure they say "student"!  Next, it will ask if they are 13 and older, or under 13.  I wanted to clarify what the implications of that choice meant, so I emailed Screencastify's support and got this response:

"Under 13 students have the ability to use Screencastify. We have numerous classrooms of all ages using Screencastify. However, students choosing under 13 does a couple things:

1. It removes them from receiving any unsolicited emails from Screencastify. The students can still reach us for help though.
2. It removes them from any Google Analytic tracking."
My advice?  It may be best for students to say "under 13" to better protect their data, but regardless, students should honestly answer the question; under 13 can still use the extension.

I hope your students use Screencastify to bring their presentations and exhibitions to the next level, as well as provide teachers with another way to assess learning.

Update 3/30/17:  In my original entry, I neglected to highlight two other important functions.  When Screencastify is in its Tab (screencasting) mode, you can:

  •  record streaming video while cleanly capturing computer audio
  • annotate in real time while recording using some simple but effective drawing tools.
You can see an example of both in this short linked video I created.   Note that the audio is slightly out of sync with the video.   You can minimize this by reducing the amount of programs running or tabs open on your Chrome browser, but there will likely always be a touch of this lag.

When you only want the "tab audio," make sure to uncheckmark the box for "Microphone." Another option would be to use a headset or earphones/mic and keep both boxes checkmarked; you could then pause the streaming video and make a point or ask your listeners a question. (I don't recommend keeping both boxes checkmarked without a headset or earphones/mic, because your laptop mic will pick up the audio of the streaming clip from your laptop speakers, causing echo and distortion.)


The drawing tools are on the lower left.  You can change color and size, as well as erase.  If you used it with the microphone idea above, you could not only narrate but literally illustrate your point!


Do you use Screencastify, or another Chrome screencasting app/extension?  Share your experience in the Comments below.


Wednesday, August 27, 2014

Odds and Ends: YouTube, MacBook Air, and another Shelby edtech rollout!

Brief bits of info to share:

Yesterday afternoon I was invited to Martha Layne Collins High School as MacBook Airs were given to the staff.  The principal Mr. Leeper and Shelby CIO Tommy Hurt had kind words of introduction, which I humbly accepted. (You can check out Mr. Leeper's blog here.)  MLC HS is my next embedded school, so I'll be returning there in a few weeks....

I have a new how-to video on using your webcam to record video and upload it, all done inside YouTube and your browser.  You can view it below.


Lastly, for those that one a handy one-sheet of Mac keyboard shortcuts, I found one here for the Maverick OS that is extremely useful.  Save, Evernote, and/or print this sucker!  (It's also posted under "My Favorite Edtech" on my district page.)

Until next time!

Tuesday, August 26, 2014

FlipGrid

Sara Kajder (@skajder) is an educator and author.  Back in my U of L college days, I was fortunate enough to have Dr. Kajder as one of my education professors.  Web 2.0 was in its infancy, but Sara impressed me with her ability to integrate literacy with (what was then brand new!) edtech.

Recently, Dr. Kajder reached out on Facebook to her teacher Friends and asked them to share how they plan their classes, for the benefit of her pre-teaching students.  The way she did so, however, introduced a new tool to my toolbelt: FlipGrid.

How does it work?  A teacher sets up an account and creates a Grid (think of it as a class, section or period).  For each Grid, you can create Questions to pose to your students.  For each Question, the students record a video Response up to 90 seconds in length, which is uploaded to the site; students can also view the Responses of others.   Each Question has its own sharable unique URL. You can create as many Questions per Grid as you want, and there is no limit to the amount of Responses you can post.

After a Prezi on flipped and blended learning, I created my own FlipGrid and asked teachers to share a tool they planned to try out in the classroom.  (Kara Clark of Southside Elementary was the first to respond to the Question!)


The interface is one of the simplest I've seen.  No student accounts or logins are necessary; just go to the Question's link.  Click on the plus sign, and once you give the site permission to use your webcam and mike, you can be recording in seconds. A timer counts down your 90 seconds as you record, and you keep doing it over until you are happy with the end result.

How could you use it?  As I showed with Dr. Kajder and myself, getting a different kind of feedback for PD, and create sharing across a school or district, could be a new way of  interacting with teachers. This is a fantastic and engaging way to get feedback from your students -- ALL students.  You know the one that won't pick up a pencil?  Or an exceptional child that has difficulty typing? Or an ELL student that is perhaps shy to share out loud in class?  Perhaps a discussion starts on FlipGrid, and continues in the classroom. Or have students watch at least two other responses and uptake what was said by posting on an online forum.  For flipped classrooms, students could watch your content on YouTube or a TED talk and their FlipGrid response is the accountability piece to make sure they did the outside classwork.

Downsides?  On my MacBook Air, I found that FlipGrid worked best with Safari.  (I could not record in Chrome.)  I tried to access a FlipGrid Question with my Android smartphone via a Firefox browser; I could watch Responses but I could not record one. According to their FAQ, there is an iPad app, with iPhone and Android apps in the works for 2015.  Responders will therefore need an iPad or a webcam and mike for desktop computers (any recent laptop will have both built in).  You can get a 21 day free trial to try it out, but afterwards it is $65 a year.  You are limited to 5 Grids during your 21 day trial, and 10 Grids on the K-12 paid account.   The Questions (and therefore, the video Responses) are not truly private, since anyone with the link can access, so I recommend getting permissions from parents, especially from those under 13.

Give FlipGrid a try, and if you do, please share your experience in the comments below.

[Update 5/3/17: Flipgrid now offers a limited free single grid option for teachers, Flipgrid One.  Be sure to visit their site for the latest price structures and options.]