Showing posts with label screencasting. Show all posts

Saturday, July 13, 2024

Snorkl

As a former high school English teacher, I always felt pressured to provide useful, personalized feedback quickly.  Digital tools like the Comment feature in Google Docs became popular just as I was leaving the classroom, and certainly shifted the paradigm when it came to giving "just in time" quality feedback.

Now, thanks to artificial intelligence, we are on the precipice of the next generation of digital feedback that can transform teaching.   For some time now, genAI chatbots like ChatGPT already offer an augmented opportunity to comment on student writing -- if you are willing to engineer a prompt for what you are looking for, then copying and pasting each student essay into the tool, then copying and pasting any AI feedback you wished to share back with a student.  (You can even include your rubric in your prompt, so you can get your feedback with a suggested assessment score.)  This is free and helpful, albeit time consuming and clunky.

But now we enter what I am calling the "refurbished" phase of AI.  In these newest AI tools, the programming is more hidden under the hood, while the interface is much more user friendly and less dependent on prompt engineering.  And that leads us to the tool for today's entry: Snorkl.  While its strength in providing feedback for solving math problems seems obvious, its potential for analyzing reflection and metacognition in multiple content areas is also apparent.

How does it work?

You can sign up free with a Google or Microsoft account.  Snorkl will ask you whether you are a teacher or a student -- I'm not sure how easy it is to change this if you answer wrongly, or are wanting to see what the other side is like before trying to return to your standard role, so choose wisely.

Your home page is intuitively organized with several options.  A "Getting Started" box provides light tutorials for how Snorkl works. Some videos to watch are in "Resources."  You can explore premium plans; although a free account gives you unlimited classes and co-teachers, you have "limited" activities -- an actual number is not specified.  Last but not least, you can create a class where you can then make activities for students (a share link for your activities makes it easy to get students jumping in).

Your Home tab.  Note the tabs across the top for Classes and Library (see below).

What does Snorkl feel like for a student? In the pre-made "Try as a student!" section, several prompts are given so you can experience Snorkl for yourself, and reveal its potential for a wide range of content.  For example, there's one for "Trig Ratios," and another that asks you to "Identify the author's feelings about New Orleans in this 4th grade ELA assignment."  I was intrigued by the "Peanut Butter & Jelly Sandwich" activity -- a classic writing prompt I used years ago with students to show the importance of details when describing "how to" instructions -- so that's the one I chose.

When I opened it up, I first encountered the "Response Whiteboard."  

The activity's instructions are in the upper right, which can also be read aloud to the student.

As you can see from the toolbar at the top of the whiteboard, there are several buttons that allow you to insert text, pictures, and formulas for your response; while you can use the mouse/trackpad to draw, it's probably not as natural as using your finger or stylus on a touchscreen device. (This is the same whiteboard interface the teacher uses when creating the activity prompt for students.)  However, "Record Screen + Voice" is where the real magic of Snorkl resides.  While you can write or draw to your heart's delight before hitting this button, you really can't submit your response unless you make a recording.  That's because Snorkl takes what you say and converts it to text for the next step of the process. Of course, like any screencast, you could draw and type as you talk.  (The first time you do this, you'll be prompted to give permission for Snorkl to use your microphone.)

Once you submit your response, Snorkl uses AI to, in effect, analyze your thinking out loud and tell you how well you did.  The first time I responded I didn't doodle and simply talked through how to make a PB&J.  After several seconds, I got back this screen:

The comments on the right are timestamped; click on the time and you can go straight to that part of the recording.

I have to admit, this had me pretty slack-jawed.  You can play back your recording, with a running transcript in the form of captions.  Snorkl provided some simple overall feedback ("Correct," "3/4 Strong") followed by impressively detailed commentary.  Even the tone seemed appropriate -- Snorkl celebrated my strengths ("Great job on giving a detailed explanation...I love how you even included the part about opening the bread bag") while also providing me ways to improve ("Have you tried using the same knife for both the peanut butter and jelly?").

If you like, you can do another response, with either a clean whiteboard or pick up where you left off.  These additional responses become a history that you can revisit and review, to see your growth over time.

The Portfolio tab shows how Snorkl can be a place for artifacts for learning; for example, imagine a student pulling out a response during a student-led conference with their parents. 


Of course, teachers can review and play the videos of these submitted responses.  Once several responses have been submitted, Snorkl's website suggests that a teacher will be able to see some class-level insights, such as "top exemplars" and "common misconceptions," but it is also possible such insights are only fully available as a premium feature. 


Snorkl calls itself "a versatile tool for all subjects, used from elementary through college."  As an additional nod beyond the "try as a student" examples indicated above, the platform also provides some pre-made activities in several content areas and grade levels in its Library.


The library bank already covers many grade levels, with more "coming soon."


Finally, for a video on getting started with Snorkl, watch the following (3:24):


How could you use it?

Students could be assigned a Snorkl task:

  • as a more interactive type of "flipped learning" homework
  • during class as part of a blended learning station rotation
  • at the end of class as a formative assessment exit slip to determine if they understood today's content (and give the teacher data on what misconceptions to address for tomorrow's class)

Downsides?

Snorkl offers some powerful features for free, so it is hard to find faults with the tool itself beyond just how many activities you can create at no cost, or the possible limitation of the drawing features if you don't have a touchscreen device.  From a teacher's perspective, it truly can become a powerful "instructional aide" (not teacher replacer!) in your classroom.  A more likely negative is about the potential for a teacher to overuse the tool, or use it without also checking student work in person.  As always with edtech -- especially with AI -- practice moderation, oversight (it's not always right), and balance.

Have you used Snorkl, or a similar AI tool?  Share your stories in the Comments below!


Friday, May 7, 2021

Chromebooks now come with a Screen Capture tool!

 A few months ago, Google announced a lengthy roll call of upcoming changes and upgrades across its tools and platforms, which I summarized here.  One that really caught my attention: starting with Chrome version 90, the Chrome OS for Chromebooks will now include a built-in screen capture and recording tool called (wait for it) Screen Capture!

We've been deploying this latest version of Chrome to our students' Chromebooks for a few weeks now, and recently I was able to go to classrooms and see it in action.  I'm happy to report that Screen Capture seems stable and works as advertised.   (For Google's official support article on the tool, click here.)

Students with Chromebooks can access this new tool one of two ways: 

  • The keyboard shortcut Control + Shift + "Switcher" (the "box line line" icon key above the number 6)
  • The "Quick Settings" button in the lower right corner of the screen, where you will find the new Screen Capture button in the tray.

Either choice will then open up your Screen Capture toolbar at the bottom of your Chromebook.  (The default is image mode, although you can toggle over to video if you like.)   You are now a button push away from capturing the entire screen, lassoing a portion, or capturing an open window/tab; you can also just hit Enter to make the highlighted choice happen.  One clever feature is that captured images are automatically put into your clipboard, making it very easy to immediately paste them into a document. 

The Screen Capture toolbar.  Screenshot from John R. Sowash's website Chromebook Classroom.
  Read here for some tips and other details about the tool!

Note that if you are in video mode, you can click the settings (gear icon) to turn on or off your microphone as part of the screencast recording.  However, two caveats: the only audio you can capture is from your mic (no computer generated audio can be recorded), and trying to record a video of a video that is playing or streaming will tax the Chromebook's processor and produce iffy results at best.  Some examples of when the screen recorder might be most effective:

  • narrating through a Slide presentation
  • discussing your research on a topic while flipping through tabs of various website resources
  • explaining your latest revisions on a Doc
  • showing a teacher how something is not working in order to troubleshoot a tech problem

By default, the saved images and recordings are put into your Chromebook's Download folder, at which point you could either upload it to your Drive or delete it after its purpose has been served.  (This also implies that you can do screen capturing and recording without being online!)  I find this feature helpful, because it allows you to be more disposable with screen captures and not necessarily clutter up your Drive's storage space; do you really need that image for perpetuity once you've inserted it into your Slide presentation?  On the other hand, your Chromebook's hard drive storage is much more limited than a typical laptop, so students may need to be reminded to clean out their downloads periodically.

With such a useful tool now built-in and free, should you stop using other add-on screencasting Chrome extensions?  Not necessarily.  To take one example, Screencastify offers additional features like "telestrating" annotation during recording, as well as some limited editing,   However, the free version of Screencastify is also limited to five minute videos!  It is therefore hard to beat Screen Capture, especially for its convenience, simplicity and speed of use.


Wednesday, April 21, 2021

Explain Everything (Web Version)

Explain Everything is a tried-and-true digital whiteboarding tool that has been around for many years, although in full disclosure mode,  I have been more familiar with a similarly functioning iOS app ShowMe (one I've mentioned several times on this blog).   Both of these have mainly been known as tablet apps.  However, I discovered that Explain Everything now has a browser-based version, and even if the phrase "game changer" is way overused, I think it applies here -- especially if you're looking for a useful presentation tool while facilitating a concurrent or virtual classroom.

How does it work?

Firstly, you will want to make an account.  Free is an option (but see "Downsides" below for more on the paid options); you can use Google or create an account through any email.  This will enable you to save and revisit "Projects" as well as collaborate with others.  When you first use the site, you need to allow it to access your microphone.

Explain Everything can be used presentationally or collaboratively. Its robust features that differentiate it from other types of whiteboard tools start becoming apparent from the minute you launch it -- you can choose a blank canvas, but several useful project templates are also available like storyboard, timeline and Venn diagram.

This is an example of the Explain Everything template "Meeting."

Your annotation and presentation tools are along the left side.  They include the usual suspects such as a Hand (selector), Draw, Highlighter, Eraser, Shapes, Text, Add Media, and a laser pointer.   You can zoom in and out of your Project in the bottom left.

Another innovation for Explain Everything is how collaboration can occur.  In the upper right, once you are signed in, you will see an Invite Code for your Project.  This can be shared so that others can instantly join you, from either entering the code at the main Explain Everything site or as an option when someone first launches the browser app.  


If you click on this invite button, you can see other options.  You can share a URL to your Project, change your access permissions (for example, anyone with the link can only view), or change the Scenario from the default of "open collaboration" (everyone works together freely) to "presentation" or "interactive broadcast" if you plan to screenshare your Project.  Using your microphone can allow your collaborators / viewers to hear you as you whiteboard.  

Lastly, there is a screen capture tool that allows you to record, or screencast, whatever is within an adjustable frame, which can also include you narrating from your microphone.  Creating a screencast will also open up some video editing features, but there are limits in exporting video with a free account. (Note that when "Adding Media," one of the options includes using your webcam to take a picture; you can also insert existing audio.)

For a short overview of how the internal screencasting and clip editing can work, watch the following video (2:04):


How could you use it?

Explain Everything creates an immersive interactive space to collaborate and ideate with colleagues.  Students may do the same, especially with working through a compare/contrast of two concepts, making a storyboard plan before recording a film, or capturing prototype ideas during design thinking.  

You could also use the tool presentationally to an audience.  This audience could be experiencing your Project live via screensharing during a teleconference meeting, or asynchronously by watching a screencast recording. 

Lastly, and obviously, Explain Everything is perfect for a concise explanation of a concept or process, in a way more engaging than simply narrating as you click through static slides.  Explaining math processes in particular would be a natural for such a tool.

You might consider getting around the limitations of video exporting by screencast recording with another tool (like Screencastify or Screencast-o-matic), but the trade off would be the inability to use Explain Everything's internal editing, or potentially sharing videos on its own cloud service.

Downsides?

The free version of Explain Everything only allows up to 3 projects, 1 slide per project, and 1 minute of exported video.  Because of these limitations, you will likely want to consider getting a paid version of the tool.  Current pricing is reasonable, however; for $24.99 a year, you can have unlimited projects, slides, and recordings, as well as 1 GB of cloud space. Also, if you use Chrome, make sure hardware acceleration is on or else you will have to use another browser.


Explain Everything was already (and remains) a highly useful tablet app, but this new browser-based version means theoretically that any laptop or Chromebook can now use it too.   Consider it as an alternative to Google Jamboard or Padlet the next time you want to collaborate in a small group, or as a new way of presenting your ideas to an audience.

Do you use Explain Everything? Do you have a different favorite digital whiteboard tool?  Share in Comments below!

Wednesday, February 17, 2021

Learning with Google: Announcements for 2021

Earlier today, Google held their global online livestream "Learning with Google."  Over the course of ninety minutes, they rolled out a roadmap of upcoming changes and upgrades to the Google platform happening between now and the end of the year.  It was a bit of an information blitz and I felt exhausted afterward trying to take notes and keep up.   If there was ever such a deluge of new Google announcements released in one afternoon, I can't remember it. 

As a way of digesting some of the highlights of their announcements, I thought I'd blog!   Let me say a disclaimer from the top: as much as I am trying to be accurate, I could have made an inaccurate note or the timetable might change.  So make sure you check directly with Google (like using the link to the Google Education blog entry above) to verify pricing and other details.

A Change of Name and Four Options

First, a question to make you feel your age:  did you know that Google Suite apps are over a decade old?  Hard to believe Docs and Drive started back in 2008.  As these tools grew from Google Apps for Education to G Suite for Education, many wondered if our free ride would end.   And it hasn't yet...at least, not quite.

The good news: Google says they are committed to a free option for education.  However, besides a name change to Google Workspace for Education (to better align with their actual Workspace business offering), it will now offer THREE premium paid tiers: Google Workspace for Education Standard, Teaching and Learning Upgrade, and Google Workspace for Education Plus.

What are the differences?

  • Google Workspace for Education Fundamentals is basically the current free version of G Suite for Education. 
  • Google Workspace for Education Standard will be available for $3 per student per year (and you have to purchase for all students in your domain all at once). It offers a bit extra over Fundamentals, but mainly on the admin side of the fence: enhanced security features, some log exporting, and easier data migration.
  • Teaching and Learning Upgrade will be available for $4 per license, per adult, per month.  (Assuming you want the upgrade all year, that means $48.00 per staff member.) This granular distinction is important, in case you possibly only want certain staff to have this upgrade and only for a certain number of months.  Teaching and Learning includes originality reports for student work, a soon to launch Classroom Add Ons feature (see the below section for more details), and many of the previously announced Google Meet features like breakout rooms, recordings that do not expire after 30 days, and room polling.  As you decide which staff may need the upgrade, consider the people who will most likely be leading will need it.  For example, a staff member with the T & L upgrade who creates a Google Meet can have breakout rooms AND a non-upgraded staff or student attending such a Meet would still be able to interact in those breakout rooms; however, if a non-upgraded staff member creates a Meet, breakout rooms are not an option.   (One assumes features like Classroom Add Ons work in a similar way; it is a question of whether the creator of the Classroom has the upgrade or not.)
  • Google Workspace for Education Plus -- formerly Google Enterprise for Education -- is the Cadillac version, available in April for $5 per student per year (and you have to purchase for all students in your domain all at once). It includes all the features of Education Standard AND Teaching and Learning Upgrade.  You also get some bonus features such as an interior Google search (allowing you to look up public Docs across your domain), livestream capability to 100K users, and a synching of Google Classroom rosters to your SIS (Student Information System, such as Infinite Campus).  As you budget and consider your options, definitely compare your total cost of upgrading all staff to Teaching and Learning versus the cost of upgrading your domain to Plus -- you may find that with just a little more expense, Plus provides maximum benefit.

From this point forward, when you hear a new Google feature launch, verify which tier it will apply to.  It may not be yours!  For more details on your options:

Google Classroom, Forms, Docs,  and Jamboard Upgrades

Fun fact: since February of 2020, Google Classroom has gone from 40 million users to 150 million worldwide!

Here are some other highlights rolling out by the end of the year:

  • Google will launch a Classroom Add Ons "store."  This creates an opportunity to put certain outside tools inside of your Classroom Assignments -- students can access and complete them without leaving the tab, and then their scores/grades will go straight to the Classroom's gradebook.  Announced partners available at launch will include Nearpod and Kahoot.  Available with Teaching and Learning Upgrade or with Plus.
  • There will be a "Student Engagement Tracking" to analyze student usage.  When did they last log in? What was the last thing they submitted?
  • For admin, deeper and more detailed analytics of Classroom usage across the domain.  Available with Standards or with Plus.
  • The mobile app version of Classroom will be able to work offline and will be more effective with intermittent Internet/cellular connection.  Additionally, a student using the Classroom app will have an easier time, and more options, for submitting pictures (such as taking a pic of a "paper and pencil" assignment).
  • Rich Text Formatting is coming.  You can finally bold, italic, underline text! Add bulleted lists!
  • Forms:  The angels must be singing, because Forms will begin saving your work in the background as you type and select.  No more lost information from accidentally leaving the page, closing the tab, or losing your Internet connection.  And if any of those things happen, you will be able to return to the Form and pick up where you left off.  (Data is remembered for 30 days or until the Form is submitted, whichever happens first.)  That includes Form Quizzes!
  • Docs:  The Citations feature is improving with some smart suggestions. For those with Education Plus, Google is adding an "Approval" feature under File; you would be able to submit your Doc to selected members of your team to "sign off" on your work.
  • Jamboard: you will finally be able to track changes and see edits made by your students!
  • For more details and other coming Classroom features, read this Google blog entry.

A preview of "Student Engagement Tracking" in Google Classroom coming later this year.


Google Meet

What would so many of us do without Meet during pandemic teaching?  Therefore, and not surprisingly, Google spent some significant time talking about the future of Meet.

Google first tipped their hand to the start of premium tiers with Meet features that were exclusive for those that paid for Enterprise, such as beloved breakout rooms.  In fairness to Google, however, not all of its upgrades cost money, and some of the future ones will be for (free) Fundamentals unless otherwise noted.

  • At the end of the meeting, teachers will have the option to end the Meet for all participants, including those in breakout rooms.  That means no more students possibly staying on to chat without you.
  • In the next few weeks, you will be able to mute all participants, and choose whether students can unmute themselves.
  • Starting in August, there will be several improvements for Meets that are integrated into a Google Classroom:
    • students will not be able to join the Meet until a teacher starts it
    • only students and teachers of that Classroom can join that Meet
    • all teachers of that Classroom will have moderator controls
  • In Google Calendar, breakout room participants can be determined in advance while creating a calendar event.  Available with Teaching and Learning Upgrade and with Plus.
  • Besides hand raising, students will also be able to react with emojis -- and in a wonderful nod to diversity, can change the skin tone of the emojis to better reflect themselves.
  • Meet will also be better optimized to work with lower strength WiFi.
  • For more details and other coming Meet features, read this Google blog entry.

Chromebooks

Admittedly, I was a bit surprised to hear newsworthy updates for Chromebooks and its Chrome OS, but they included:

  • Starting with Chrome 89 (launching March 9), the OS for Chromebooks will include a built in screen recording tool!  This may replace your current screen recording apps like Screencastify that need to be separately installed and may have limited recording times.
  • Google Meet will be optimized for Chromebooks and Chrome, which will especially be welcome when multitasking or for Chromebooks near their end of life.  This may become important as more anecdotes and news stories come out about Chromebooks struggling with other teleconferencing platforms that could also be shortening their life cycle.
  • More Chromebooks will be offered with dual cameras, allowing students to better take pictures or record videos beyond selfies.

Accessibility and the Future of Assistive Technology

While "Accessibility" has always been part of Chrome settings that follow you across devices, Google announced some upcoming features such as multiple options for changing your cursor color.  (For more on Google and accessibility, check out this link.)  The livestream ended with an interesting discussion on the future of Google as assistive technology.  Consider "assistive" as any way to augment or make your life easier; for example, Chrome remembering your password or autofilling your shipping address.  Artificial Intelligence, however, is making the possibilities even more intriguing.  AI may become your next classroom Instructional Assistant!  (And yes, I'm trademarking the acronym AIIA.).  Google shared how districts are utilizing Google Cloud Success Services to create a chat virtual assistant, and in one example, it was able to solve 92% of user inquiries on its own.  Other examples include typing an equation into the Google search button and getting a step by step explanation of the solution (something you can do now with the mobile Google Lens app), or typing "[kind of problem] practice problems" to get virtual self-tutoring. 

An example of searching "linear equations practice problems." Note that you not only get those practice problems, but an overview, examples and more!

Between the product announcements, the livestream shared some inspirational pandemic teaching stories from across the world. Diana Parra, Professor of Information and Technology in Medellin, Columbia, said: "My challenge at the moment as a teacher, is to take the technical things we know, and amidst a crisis, to make them human."  May we all do our best to take the digital tools at our disposal to make our teaching not about the Internet or Google Apps or the device but the human student at the other side of our screen.  Our teaching may not be in person, but we can still try to make it personal.  

If you're interested in watching the archived livestream, here is the video (1 hour 37 minutes): 


What is an upcoming Google feature that makes you excited?  Share in the Comments below!

Edit 2/19/21: The archived video of the livestream is now published, and I added it to the blog entry.  Also, I made a small edit about the Forms update - an incomplete Form is only saved for 30 days or until it is submitted, whichever comes first.

Edt 2/23/21: After watching a presentation today by AmplifiedIT, a few more clarifications and corrections: The new Doc Approval feature is only available for Education Plus, Chrome 89 is launching March 9, and I explained what could potentially happen when T & L upgraded staff interact with non-upgraded staff.

Edit 4/28/21:  I was made aware that the Teaching and Learning upgrade license is based on a MONTHLY fee, not annually like Standard and Plus.  I updated the information above to reflect this, as well as included a useful Google resource that compares the editions side by side.

Tuesday, June 13, 2017

Summer 2017 Professional Development PD Adventures

Greetings from the last month of the 2016-2017 school year!  As we near the end of one cycle and prepare to begin again in July, I have had the pleasure and privilege of recently attending and presenting at two professional development opportunities with one more major regional PD coming in August!

For the third year in a row, I attended the free Innovations for Learning conference in Lexington on June 1.  (For the first time, their registration numbers resulted in a "sell out"!)  In the morning, I partnered with the KDE KyGoDigital team to work with CIO's and TRT's about how Google apps and other key edtech can impact instruction.  In the afternoon, I presented a few sessions on game-based learning / gamification, as well as innovative presentation tools for teachers and students.  This last session was livestreamed via KDE's YouTube channel:


Note: CheckThis, the last web tool in the presentation above, just discontinued its service.

IFL is an incredible and generous opportunity from Fayette County to learn, share and network.  I highly recommend attending it next summer if you can, and follow the conference hashtag at #IFLLEX.

On June 7-9, Jefferson County Public Schools had its first Deeper Learning Symposium.  (Follow their hashtag #JCPSDL.)  Nearly two thousand JCPS educators descended on the Kentucky Exposition Center to expand their conceptualization of what learning needs to be.  As a person who had their presentation proposal accepted (once again on the topic of game-based learning), I was a fortunate non-JCPS attendee.  While several sessions were intriguing, one of the more inspiring sessions was a keynote screening of the documentary Beyond Measure, which happens to feature the journey of Kentucky's Trigg County Public Schools from traditional methods into a new mode of teaching and learning.  I was excited to see educators, many for the first time, talk about using Twitter, competency-based education, the power of PBL, and so much more!

As we look ahead, don't forget that EdCampKY will be at Bardstown Middle School on August 26, 2017.  Be sure to get your free tickets here!

Friday, March 17, 2017

Screencastify

One of the struggles with a Chromebook is recording video. In terms of "out of the box," you can only use the webcam for taking still pictures.  While this is useful, recording videos is a needed functionality for students to better demonstrate their understanding, or create engaging presentations.   However, you can't install programs on a Chromebook, and some sites require a Java plug in that won't run on the device.  For example: for most laptops, my favorite screencasting program is Screencast-o-matic. It can be installed on your desktop (my recommendation) or ran inside of the web browser. The final video makes a glowing holo around the mouse cursor to help track its movements and, if used intentionally while recording, can help bring attention to a particular word, phrase or part of a picture.  Lastly, the video can be easily exported to your desktop or uploaded to your YouTube channel or Schoology Course.  (It's free for exported videos fifteen minutes long or less.)   However, Screencast-o-matic won't work even within the browser of a Chromebook because of that elusive Java applet, and again, you can't install the program.  So if not Screencast-o-matic, what are your options for video recording?

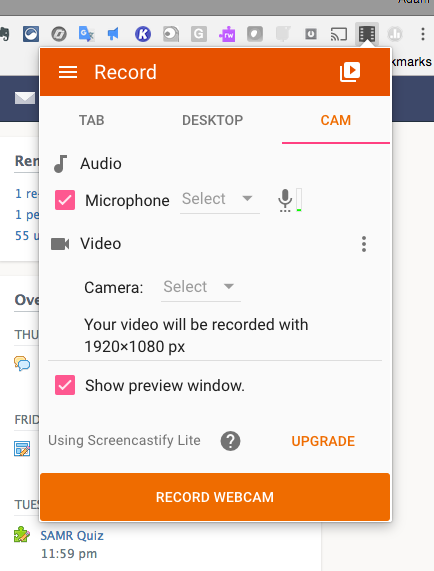
There are several Chrome apps and extensions that will do the job, but from anecdotes, reviews and personal experience, I recommend the Screencastify extension.  The Lite version is free, yet fairly generous: your videos can be up to 10 minutes long, and you can record up to 50 videos a month.  While you can do traditional screencasting with the app, you can also choose the "Cam" option to only record via the Chromebook's camera.

I recommend checkmarking the "Show Preview Window" option to make recording easier.


Best of all, any videos made will automatically be saved to your Google Drive. The first time you record, a "Screencastify" folder is created in your Drive, making it always easy to find clips later.

The directions for installing and running the extension are pretty straightforward.  Therefore, instead of instructions, I want to share some tips for using and installing Screencastify:

  • When installing Screencastify and using it for the first time, be aware of all the various permissions it requires: to access your Drive, to access your webcam, etc.  Make sure to okay all of these so it will work properly.
  • Screencasting can be a performance hog, especially on a Chromebook.  I recommend closing out as many tabs as possible while recording.
  • It will take a few minutes to render the video so it can be played from Google Drive.  If it's the maximum length of ten minutes, that might mean 15 minutes or more to finish rendering.  If in-class time is limited when using Screencastify, plan accordingly.  Once finished, the file can be renamed and shared just like any other Google file.
  • Screencastify, like many screencasting tools, is simple for  "one take jake" recordings.  Don't expect fancy editing tools or ways to cut clips together.  (You may want to consider WeVideo as a cloud based editing option.)  However...
  • Finished videos on your Drive can now be easily inserted into Google Slides.  (In the past, you could only insert YouTube clips.) Once inserted, you can right click the video for some limited ability to trim the video; you can tell it when to start or stop. This might be helpful if doing a presentation and you only need to share part of the video.
  • Last but not least, Screencastify will ask the person installing the extension what their role is; make sure they say "student"!  Next, it will ask if they are 13 and older, or under 13.  I wanted to clarify what the implications of that choice meant, so I emailed Screencastify's support and got this response:

"Under 13 students have the ability to use Screencastify. We have numerous classrooms of all ages using Screencastify. However, students choosing under 13 does a couple things:

1. It removes them from receiving any unsolicited emails from Screencastify. The students can still reach us for help though.
2. It removes them from any Google Analytic tracking."
My advice?  It may be best for students to say "under 13" to better protect their data, but regardless, students should honestly answer the question; under 13 can still use the extension.

I hope your students use Screencastify to bring their presentations and exhibitions to the next level, as well as provide teachers with another way to assess learning.

Update 3/30/17:  In my original entry, I neglected to highlight two other important functions.  When Screencastify is in its Tab (screencasting) mode, you can:

  •  record streaming video while cleanly capturing computer audio
  • annotate in real time while recording using some simple but effective drawing tools.
You can see an example of both in this short linked video I created.   Note that the audio is slightly out of sync with the video.   You can minimize this by reducing the amount of programs running or tabs open on your Chrome browser, but there will likely always be a touch of this lag.

When you only want the "tab audio," make sure to uncheckmark the box for "Microphone." Another option would be to use a headset or earphones/mic and keep both boxes checkmarked; you could then pause the streaming video and make a point or ask your listeners a question. (I don't recommend keeping both boxes checkmarked without a headset or earphones/mic, because your laptop mic will pick up the audio of the streaming clip from your laptop speakers, causing echo and distortion.)


The drawing tools are on the lower left.  You can change color and size, as well as erase.  If you used it with the microphone idea above, you could not only narrate but literally illustrate your point!


Do you use Screencastify, or another Chrome screencasting app/extension?  Share your experience in the Comments below.