Education technology and game-based learning resources, tool tips, innovative pedagogical musings, and general "thinkalouds" of a Digital Learning Consultant. Follow my educational journey on Instagram, X , Threads and Bluesky @watsonedtech, my Facebook Page (facebook.com/edtechelixirs), and the blog hashtag #edtechelixirs. Note that opinions are mine alone, and reviews/mentions of edtech products do not qualify as an endorsement. Subscribe to the blog at bit.ly/signupedtechelixirs.
A few months ago, Google announced a lengthy roll call of upcoming changes and upgrades across its tools and platforms, which I summarized here. One that really caught my attention: starting with Chrome version 90, the Chrome OS for Chromebooks will now include a built-in screen capture and recording tool called (wait for it) Screen Capture!
We've been deploying this latest version of Chrome to our students' Chromebooks for a few weeks now, and recently I was able to go to classrooms and see it in action. I'm happy to report that Screen Capture seems stable and works as advertised. (For Google's official support article on the tool, click here.)
Students with Chromebooks can access this new tool one of two ways:
The keyboard shortcut Control + Shift + "Switcher" (the "box line line" icon key above the number 6)
The "Quick Settings" button in the lower right corner of the screen, where you will find the new Screen Capture button in the tray.
Either choice will then open up your Screen Capture toolbar at the bottom of your Chromebook. (The default is image mode, although you can toggle over to video if you like.) You are now a button push away from capturing the entire screen, lassoing a portion, or capturing an open window/tab; you can also just hit Enter to make the highlighted choice happen. One clever feature is that captured images are automatically put into your clipboard, making it very easy to immediately paste them into a document.
The Screen Capture toolbar. Screenshot from John R. Sowash's website Chromebook Classroom. Read here for some tips and other details about the tool!
Note that if you are in video mode, you can click the settings (gear icon) to turn on or off your microphone as part of the screencast recording. However, two caveats: the only audio you can capture is from your mic (no computer generated audio can be recorded), and trying to record a video of a video that is playing or streaming will tax the Chromebook's processor and produce iffy results at best. Some examples of when the screen recorder might be most effective:
narrating through a Slide presentation
discussing your research on a topic while flipping through tabs of various website resources
explaining your latest revisions on a Doc
showing a teacher how something is not working in order to troubleshoot a tech problem
By default, the saved images and recordings are put into your Chromebook's Download folder, at which point you could either upload it to your Drive or delete it after its purpose has been served. (This also implies that you can do screen capturing and recording without being online!) I find this feature helpful, because it allows you to be more disposable with screen captures and not necessarily clutter up your Drive's storage space; do you really need that image for perpetuity once you've inserted it into your Slide presentation? On the other hand, your Chromebook's hard drive storage is much more limited than a typical laptop, so students may need to be reminded to clean out their downloads periodically.
With such a useful tool now built-in and free, should you stop using other add-on screencasting Chrome extensions? Not necessarily. To take one example, Screencastify offers additional features like "telestrating" annotation during recording, as well as some limited editing, However, the free version of Screencastify is also limited to five minute videos! It is therefore hard to beat Screen Capture, especially for its convenience, simplicity and speed of use.
For several years, Storify was one of my favorite free "go to" edtech tools. You could use it to collect digital artifacts -- URLs, pictures, YouTube videos, social media posts -- and you could sequence these items to create a narrative in order to share with others. However, like other online tools that come and go, it unfortunately shut down in May 2018.
When one edtech door closes, another one often opens. Last year, I was excited to be introduced to Wakelet. In the months since, I've not only seen how Wakelet is more than able to fill the void that Storify left, but I have also been impressed with how it continues to mature and improve with new features.
How does it work?
Making a "Collection" in Wakelet is quick and easy; the interface is very user friendly. First, you need to create a free account. You can use Google, Microsoft, Facebook, or just use your email address. When you create an account, you will choose a name that will determine your profile's URL. (Here's mine as an example.) Once your account is created, you can follow other Wakelet users, and they can follow you. Your followers will be notified when you publish a public Collection, as you will be notified when the people you follow do the same.
As you create a new Collection, you begin to make choices such as the title and whether it will be public or private. Once you start a new Collection, what can you add? You can insert text, websites via their URLs, YouTube videos, tweets (you can search by username or hashtag), pictures, PDFs, and even include files straight from your OneDrive or Google Drive.
As you add certain content, Wakelet remembers them as "Bookmarks." This makes it easier to insert that content in future Collections.
One of the newest features of Wakelet is inserting "Flipgrid Shorts." This is an opportunity for the person making the Collection to record a webcam video up to three minutes long; as with standard Flipgrid videos, you can use fun filters or insert graphics and text. The 49 second video below shows how this works. Note that this Wakelet option is not really the full Flipgrid experience; you cannot log into your separate Flipgrid account to natively insert what you've already created, nor are viewers of the Collection able to respond to your "Flipgrid Short" with comments or video replies of their own while within the Wakelet site. (Tip: if you're wanting to create an opportunity for an interactive Flipgrid experience, simply insert your grid's URL into your Collection like you would any other website.)
There are other Wakelet features that affect the viewing experience. The creator of the Collection can choose various ways of presenting the materials, including a "Mood Board" option. Another new feature utilizes Microsoft's "Immersive Reader" in order to read aloud your Collection! Lastly, if viewers are logged into their own Wakelet profile, they can copy a Collection to their account to edit and publish their own version as they see fit, assuming that the creator of the Collection permits this to happen.
Wakelet makes sharing a published Collection very simple, with built in tools for several social media platforms, as well as options like a shortened URL and a QR code.
Recently, Wakelet now allows multiple ways for users to collaborate on the same Collection. In theory, collaborators do not even need Wakelet accounts to interact in a Collection. Collaborators can be given access directly via their Wakelet profile name or email, or indirectly via URLs and QR codes. (Keep in mind that collaboration tools are in beta as of February 2020.)
Last but not least, Wakelet offers iOS and Android apps. This allows users to be able to create Collections from their mobile device, albeit the options are more limited than the full website version of Wakelet. I've created a Collection that demonstrates how the mobile app works, which is also embedded below:
How could you use it?
Teachers could use Wakelet to capture resources while at a conference -- the key tweets sent out from a hashtag, the Google Docs shared by presenters, and so on. You could also create narratives consisting of text, websites, and social media posts that chronicle a current event to share with students. Students could use Collections as a way of saving research, composing mini-"hyperdoc" essays, creating an online portfolio of learning artifacts, or collaborating with team members on resources while working through a PBL.
Downsides?
Storify allowed you to natively find and embed Facebook and other social media posts; I would like Wakelet to easily do the same beyond just Twitter. For now, the workaround would be to find the social media post's public URL and add it to your Collection as you would any other website.
As I mentioned above, I first discovered Wakelet last year at KySTE 2019 thanks to Stella Pollard, a wonderful educator and frequent presenter! Because Stella is an experienced user of Wakelet -- be sure to check out her Wakelet profile -- what better time to interview her, as well as share her thoughts on other edtech tools?
Stella, welcome to Edtech Elixirs! Please share your educator story. I have been an educator since 2013. My journey began in Perry County Schools as a para-educator for a first-grade classroom. My husband and I moved to central Kentucky in 2014 where I was offered my first official teaching position as a middle school math and science teacher at Williamstown Jr. High School. I was offered a job closer to home in 2015 as a 6th-grade science teacher at Bondurant Middle School in Franklin County. I am currently an Instructional Technology Coordinator (Digital Learning Coach) for Franklin County Schools and I work with each of our 13 schools on effective implementation of instructional technology.
How do you personally use Wakelet? I started using Wakelet back in early 2018. I jumped onto the #WakeletWave because I was #NotAtISTE18 and needed a way to store all of the resources I found so I could come back to them at a later date. Since then, I have made Wakelet Collections for recipes to resources, lesson materials to videos, and everything in between. I love how easy it is to use on every platform (iPhone, Chrome browser, Chromebook, etc).
Have you seen students and teachers use Wakelet? I have! I have seen teachers use Wakelet as a collaborative workspace for students to digitally share and explore the work of their peers.
What is one of your favorite features of Wakelet? I love the ability to automatically store your Screencastify videos directly to a Wakelet. It's quick and effective and in my role as a Digital Learning Coach, I am always making videos for our teachers. Since you can easily access your Google Drive inside of a Collection, this gives me the ability to share those videos quickly.
Besides Wakelet, what are some other new edtech tools you are currently using? One of my newest edtech tools that I have found recently is Actively Learn - it's similar to Newsela but has features that include: asking questions in the text, including specific notes for sections for your students while they're reading, the ability to embed a video or link to a different website, and more. In addition, it speaks directly to Google Classroom so there's minimal set-up for teachers to begin. Finally, one of my favorite things about it is that the free version is pretty solid.
What's your advice to teachers just starting to integrate edtech into their classrooms? It's okay to not know everything about a tool. Students can and will figure it out long before we ever will. Don't be afraid to have your students try new things and give them the chance to input their voice in the assignments.
I want to thank Stella for taking the time to share her wisdom. Be sure to follow her on Twitter, Wakelet and beyond! And be sure to share your creative ways for using Wakelet in the Comments below.
Greetings from the last month of the 2016-2017 school year! As we near the end of one cycle and prepare to begin again in July, I have had the pleasure and privilege of recently attending and presenting at two professional development opportunities with one more major regional PD coming in August!
For the third year in a row, I attended the free Innovations for Learning conference in Lexington on June 1. (For the first time, their registration numbers resulted in a "sell out"!) In the morning, I partnered with the KDE KyGoDigital team to work with CIO's and TRT's about how Google apps and other key edtech can impact instruction. In the afternoon, I presented a few sessions on game-based learning / gamification, as well as innovative presentation tools for teachers and students. This last session was livestreamed via KDE's YouTube channel:
Note: CheckThis, the last web tool in the presentation above, just discontinued its service.
IFL is an incredible and generous opportunity from Fayette County to learn, share and network. I highly recommend attending it next summer if you can, and follow the conference hashtag at #IFLLEX.
On June 7-9, Jefferson County Public Schools had its first Deeper Learning Symposium. (Follow their hashtag #JCPSDL.) Nearly two thousand JCPS educators descended on the Kentucky Exposition Center to expand their conceptualization of what learning needs to be. As a person who had their presentation proposal accepted (once again on the topic of game-based learning), I was a fortunate non-JCPS attendee. While several sessions were intriguing, one of the more inspiring sessions was a keynote screening of the documentary Beyond Measure, which happens to feature the journey of Kentucky's Trigg County Public Schools from traditional methods into a new mode of teaching and learning. I was excited to see educators, many for the first time, talk about using Twitter, competency-based education, the power of PBL, and so much more!
As we look ahead, don't forget that EdCampKY will be at Bardstown Middle School on August 26, 2017. Be sure to get your free tickets here!
One of the struggles with a Chromebook is recording video. In terms of "out of the box," you can only use the webcam for taking still pictures. While this is useful, recording videos is a needed functionality for students to better demonstrate their understanding, or create engaging presentations. However, you can't install programs on a Chromebook, and some sites require a Java plug in that won't run on the device. For example: for most laptops, my favorite screencasting program is Screencast-o-matic. It can be installed on your desktop (my recommendation) or ran inside of the web browser. The final video makes a glowing holo around the mouse cursor to help track its movements and, if used intentionally while recording, can help bring attention to a particular word, phrase or part of a picture. Lastly, the video can be easily exported to your desktop or uploaded to your YouTube channel or Schoology Course. (It's free for exported videos fifteen minutes long or less.) However, Screencast-o-matic won't work even within the browser of a Chromebook because of that elusive Java applet, and again, you can't install the program. So if not Screencast-o-matic, what are your options for video recording?
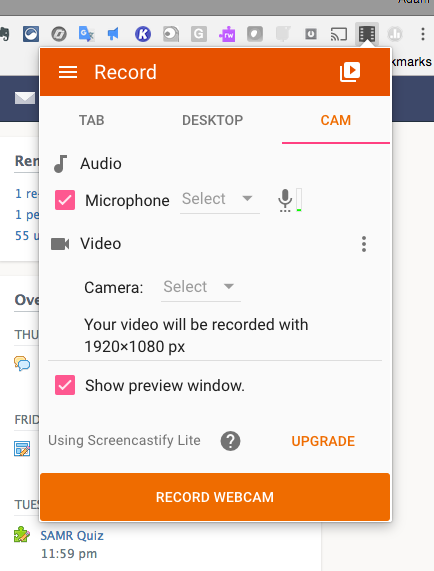
There are several Chrome apps and extensions that will do the job, but from anecdotes, reviews and personal experience, I recommend the Screencastify extension. The Lite version is free, yet fairly generous: your videos can be up to 10 minutes long, and you can record up to 50 videos a month. While you can do traditional screencasting with the app, you can also choose the "Cam" option to only record via the Chromebook's camera.
I recommend checkmarking the "Show Preview Window" option to make recording easier.
Best of all, any videos made will automatically be saved to your Google Drive. The first time you record, a "Screencastify" folder is created in your Drive, making it always easy to find clips later.
When installing Screencastify and using it for the first time, be aware of all the various permissions it requires: to access your Drive, to access your webcam, etc. Make sure to okay all of these so it will work properly.
Screencasting can be a performance hog, especially on a Chromebook. I recommend closing out as many tabs as possible while recording.
It will take a few minutes to render the video so it can be played from Google Drive. If it's the maximum length of ten minutes, that might mean 15 minutes or more to finish rendering. If in-class time is limited when using Screencastify, plan accordingly. Once finished, the file can be renamed and shared just like any other Google file.
Screencastify, like many screencasting tools, is simple for "one take jake" recordings. Don't expect fancy editing tools or ways to cut clips together. (You may want to consider WeVideo as a cloud based editing option.) However...
Finished videos on your Drive can now be easily inserted into Google Slides. (In the past, you could only insert YouTube clips.) Once inserted, you can right click the video for some limited ability to trim the video; you can tell it when to start or stop. This might be helpful if doing a presentation and you only need to share part of the video.
Last but not least, Screencastify will ask the person installing the extension what their role is; make sure they say "student"! Next, it will ask if they are 13 and older, or under 13. I wanted to clarify what the implications of that choice meant, so I emailed Screencastify's support and got this response:
"Under 13 students have the ability to use Screencastify. We have numerous classrooms of all ages using Screencastify. However, students choosing under 13 does a couple things:
1. It removes them from receiving any unsolicited emails from Screencastify. The students can still reach us for help though.
2. It removes them from any Google Analytic tracking."
My advice? It may be best for students to say "under 13" to better protect their data, but regardless, students should honestly answer the question; under 13 can still use the extension.
I hope your students use Screencastify to bring their presentations and exhibitions to the next level, as well as provide teachers with another way to assess learning.
Update 3/30/17: In my original entry, I neglected to highlight two other important functions. When Screencastify is in its Tab (screencasting) mode, you can:
record streaming video while cleanly capturing computer audio
annotate in real time while recording using some simple but effective drawing tools.
You can see an example of both in this short linked video I created. Note that the audio is slightly out of sync with the video. You can minimize this by reducing the amount of programs running or tabs open on your Chrome browser, but there will likely always be a touch of this lag.
When you only want the "tab audio," make sure to uncheckmark the box for "Microphone." Another option would be to use a headset or earphones/mic and keep both boxes checkmarked; you could then pause the streaming video and make a point or ask your listeners a question. (I don't recommend keeping both boxes checkmarked without a headset or earphones/mic, because your laptop mic will pick up the audio of the streaming clip from your laptop speakers, causing echo and distortion.)
The drawing tools are on the lower left. You can change color and size, as well as erase. If you used it with the microphone idea above, you could not only narrate but literally illustrate your point!
Do you use Screencastify, or another Chrome screencasting app/extension? Share your experience in the Comments below.